NabaztagInjector – An Arduino RFID Hack
An Arduino library to send data to Violet Nabaztag via I2C (RFID injected)
Get the latest sources and see Readme at GitHub:
https://github.com/rngtng/NabaztagInjector/
What it does
Let’s use our Nabaztag Rabbit to send some data from Arduino to the Internet. Huh! - But how?
The Nabaztag is (was) Rabbit connected to the Internet. Well, actually it’s an ARM7 processor equipped with WIFI and a couple of output and input sensors. Those input sources are:
- a microphone
- RFID reader
- a button
- tow ears which can be moved
On first sight it doesn’t seam there’s any option to connect an external device for sending data to the rabbit. But a closer look on the RFID reader showed, that the used CRX14 chip talks via I2C bus to the processor, and luckily the very same bus is also available on the Arduino.
The RFID reader works in a way, that on demand by the processor, any nearby RFID tags are discovered, requested for their 8 Byte long UID and reported back to the processor.
And that’s where NabaztagInjector hooks in: It pushes the Arduino to act in the very same way the RFID chip would, but instead of returning RFID tag UIDs it sends back any custom 8 Bytes of data (make sure to check Caveats below)
As the nature of I2C, each device has a unique address on the bus. So either NabaztagInjector or the reader can be connected at the same time - unless we are smart:
To have both devices talking to the rabbit without interference we simply switch the reader on and off and change I2C addresses on the Arduino. So either RFID reader acts as normal and Arduino has a dummy I2C address, or the reader is turned off and Arduino takes its address. To archive this, the Arduino uses a OUTPUT pin for powering the RFID reader (see_setup_) and therefore has full control over its power state.
Usage
NabaztagInjector is a static class with a very simple interface reduced down to two methods:
Nabaztag.begin( )Nabaztag.inject()orNabaztag.inject(, length)
The first one, Nabaztag.begin(
) initializes the I2C bus and turns on the RFID reader.
is the pin on Arduino where you connected Vcc to (see setup). To send data to your Rabbit, simply call Nabaztag.inject() which puts the data into send buffer, and will be send as soon it’s requested. As data is internally buffered (size 128 bytes), method call is non-blocking and can be called several times, even if data didn’t got yet delivered. The default Nabaztag Firmware request a RFID about every second.
For real-live usecases, check out the examples folder for more.
Installation
Put the library into your Arduino libraries folder, and do same with ByteBuffer.
Compilation
NabaztagInjector compiles with the latest Arduino IDE, as well as with the Arduino.mk Makefile. See examples folder.
Setup
See the picture:
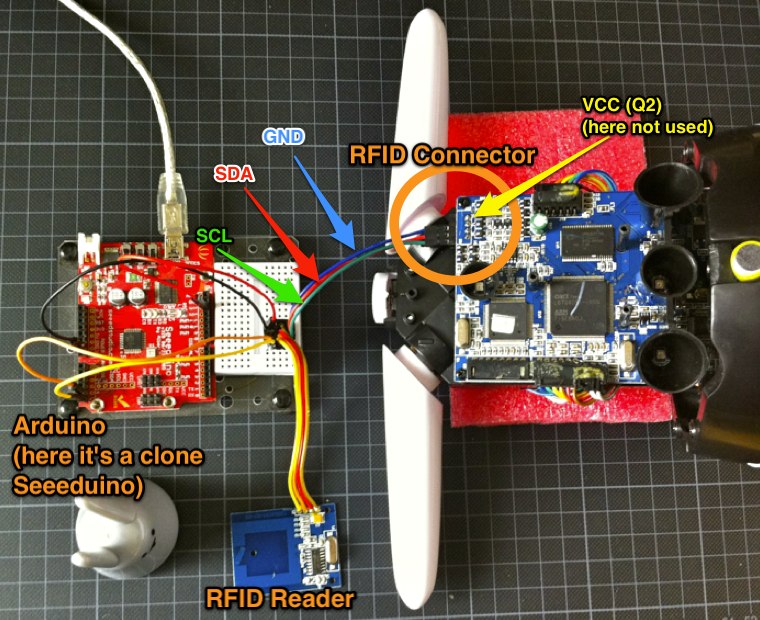
Starting from the Nabaztag mainboard: the RFID reader connector is on top left (Q2). From top to bottom the pins are: VCC (Q2), GND (Blue), SDA (Red), SCL (Green). Connect SCL to Arduino Analog Pin 5, SDA to Analog Pin 4, GND to GND. VCC can be left blank if Arduino has its own power supply, otherwise connect to Arduino power input. Connected RFID readers VCC to the pin given inNabaztag.begin(
). Go to examples folder, compile and upload sketch.
That’s it! Happy injecting!
Dependencies
For I2C communication, NabaztagInjector depends on the Arduino core library Wire. The circular send buffer depends on the _ByteBuffer_library by Siggi, and is included within the example code.
Caveats
As always there are some Caveats:
Performance
The RFID chip and the Nabaztag firmware support up 16 devices UIDs per request. Unfortunately the default bootcode doesn’t take advantage of that, so no way to speed it up. (unless you write your own bootcode, see Custom bootcode below)
Speed
The rabbit request rfid about every 750-1000ms. The 128 byte Buffer helps here to process high frequent data peaks, but obviously constant high frequent data will result in data loss.
Data
The default bootcode take only IDS as valid when upper 3 Bytes are larger than zero, fill up empty data with 0xFF is used as workaround here.
Power
I couldn’t manage to power Arduino + RFID solely by the rabbit. Arduino in standalone mode worked fine though! Maybe simple amplifier circuit would help?
Nabaztag version
I used a Nabaztag V2. Not sure if this works with V1 or Karotz as well.
Custom bootcode
Yes, it’s possible to write your own custom bootcode which allows to get rid of most of the constraints. Pls check my blogpost on that.
Supported OS
Software developed on Mac OS X. In theory is should compile on Linux & Win smoothly. Please confirm.
RFID Connector
Tests showed that there was actually no need to turn off the RFID reader chip while Arduino was sending. It was fully working by connecting just both VCC. Actually it felt even more stable.
Read on and get the latest sources at GitHub:
https://github.com/rngtng/NabaztagInjector/