mtXcontrol
Update:
This project is a contribution for the seeedstudio carnival 2009 and won the first price!
- a LED Matrix Editor -
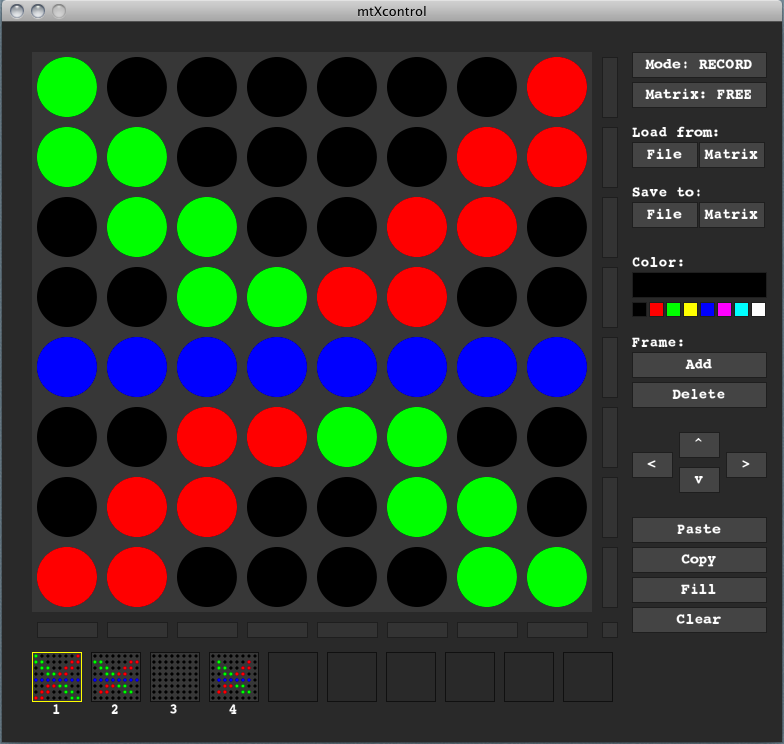
mtXcontrol is an editor written in Processing to easily create image sequences for several output devices containing multicolor LED matrix. By now, the Rainbowduino controller and the
Novation Launchpad are supported. Its generic API allows to add other in- and output devices easily.
mtXcontrol Editor auto detects and connects to your device. Once connected, you can draw points, lines & rows in different colors, create multiple frames and manipulate them. Add, delete, move, fill, copy & paste of frames is supported. Play all frames by different speed, realtime update the device and save your work as image file. If supported (e.g. Rainbowduino), update the sequence on your device and run it standalone. One special feature is typing letters and numbers. Future versions aim to support multiple devices, different color depth and many more.
Check out this short demo video:
Download mtXControl from github:
Binaries for Windows, Linux and Mac OS X
sources files
Launchpad HowTo:
Plug your Launchpad and start mtXcontrol. The device is auto detected - start drawing and pushing buttons!!
Rainbowudino HowTo:
To use your Rainbowduino with mtXcontrol you have to upload the Firmware to your rainbowduino first. See instruction here. The firmware makes use of the Rainbowduino.h Library to manipulate the Matrix easily. Make sure to put it into your Arduino Library. Connect your Rainbowduino via USB to your computer, upload firmware and you are ready to go - happy mtXcontrol drawing!
Find a detailed Step-By-Step instruction here!
Small list of Features:
* multiple Device support including auto detection
* Draw multicolor points, line and rows (4bit color support)
* Add, delete, clear, fill, *copy & paste*, move frames
* *Draw letters and numbers*, Font configureable
* Save to & load from *Bitmap file*
* Frame preview, easily navigate through
* Keyboard shortcut for each function
Rainbowduino related:
* Standalone Mode or realtime Update
* Upload and Download to Matrix *EEPROM* (mind: due to 256kb memory only up to 10 frames).
Launchpad related:
* full input support to choose color, frame & pixel
Keyboard shortcuts:
* ENTER - switch between record/play Mode
* left/right ARROW - Frame forward/backward (Record Mode) or Speed (Play Mode)
* SPACE - Insert Frame after current Frame
* D - Delete Frame
* X - Clear frame
* F - fill frame
* C - select next color
* command+S - Save to File (Bitmap)
* command+L - Load File (Bitmap OR text (.mtx))
* command+C - Copy Frame
* command+V - Paste Frame
* ctrl+LETTER - Insert this Letter/Number
* ctrl+left/right ARROW - Move Frame in direction
Rainbowduino:
* alt+ENTER - connect/disconnect
* alt+left/right ARROW - Adjust speed
* alt+ctrl+left/right ARROW - Adjust brightness
* alt+L - load from EEPROM
* alt+S - save to EEPROM
Launchpad top Buttons:
* Arrow up - new frame
* Arrow down - delete frame
* Arrow left - previous frame
* Arrow right - next frame
* Session - copy frame
* User1 - insert frame
* User2 - color preview, hold to select
* Mixer - switch between record/play Mode
Right Buttons are turn into color chooser when User2 pressed. Blinking button indicates selected color, e.g. full red + full green = yellow. Pushing grid button selects color of pushed button.
Please see README for more.